
The VR Market in 2019
Virtual Reality (VR) is still in its infancy, but market share is expected to grow significantly over the next 5 years. Driven by demand in gaming, entertainment, training, and with the introduction of lower cost stand-alone devices like the Oculus Quest, it’s expected the market for virtual reality will exceed more than $33 billion by 2024.
High Fidelity
One pioneering company that’s leading the way creating a social VR platform for creators is High Fidelity, founded by Philip Rosedale of Second Life fame. High Fidelity aims to connect a billion people, allowing for creators to self-host their own VR worlds and monetize them through the use of their blockchain virtual currency called HFC.

I had a chance to spend some time trying out High Fidelity and was impressed with the platform which is currently in the beta stage. One particularly engaging experience I had was visiting Nefertari’s Tomb, developed using high-end photogrammetry, an immersive tour led by a PhD student of Egyptian history.
The experience of taking a guided tour in a highly detailed environment, listening to others ask interesting questions, and getting expert answers to my own questions made it feel like I was really there.
Just imagine touring other archeological sites, art galleries, museums, or cultural events around the world and you’ll start to see some of the potential VR can have.
Creating VR Worlds
Interested in creating your own world in High Fidelity? This short guide will get you up and running quickly by leveraging the Google Cloud. Specifically, we are going to walk through hosting a High Fidelity domain (the server) using Google Compute Engine. Let’s get started!
Prerequisites
If you haven’t tried out High Fidelity yet, before continuing, go to the website and sign up for a free account, download the software, and get familiar with the interface. There is even a sandbox server environment you can run on your own machine to get used to the creation tools. This guide assumes you have a user account, the client software installed, and are ready to try creating your own domain hosted in the cloud.
Google Cloud Platform
As of this writing, Google Cloud Platform is offering a free 12 month $300 credit to get started with any of their offerings. This is a great opportunity to try out their Compute Engine and get started hosting your own virtual world with no up-front cost.

What is the Google Compute Engine? Similar to services offered by Amazon (AWS) and Microsoft (Azure), Google offers scalable, high-performance virtual machines to do your computation in the cloud. I found Google’s interface makes setting up a High Fidelity domain server particularly quick and easy.
First, if you don’t already have an account, follow the link below to get started with Google Cloud Platform for free:
Google Cloud Platform Free Tier
Follow the instructions for setting up your new account, you may need to provide billing information but you will not be charged if you are a new customer and eligible for the $300 credit trial.
If you have an existing account, log into your console to proceed.
Google Compute Engine
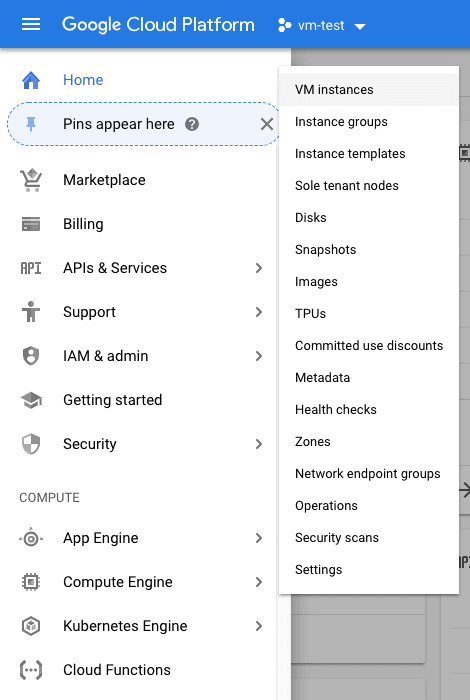
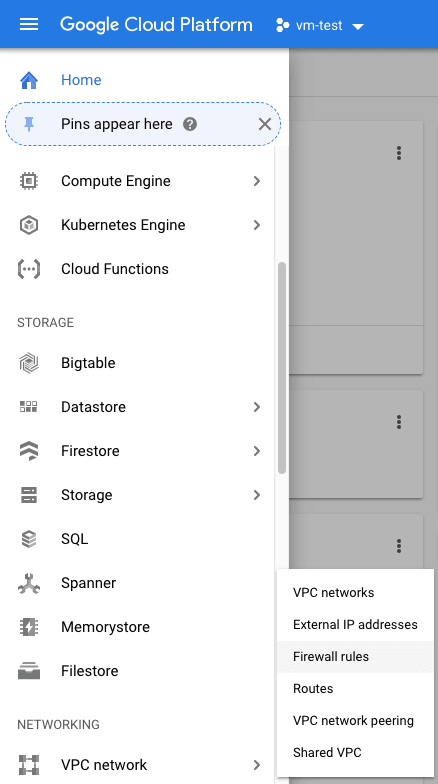
Next, you’ll want to click on the menu icon on the top left of the blue navigation bar at the top of the screen. The menu will appear on the left with a list of services available.
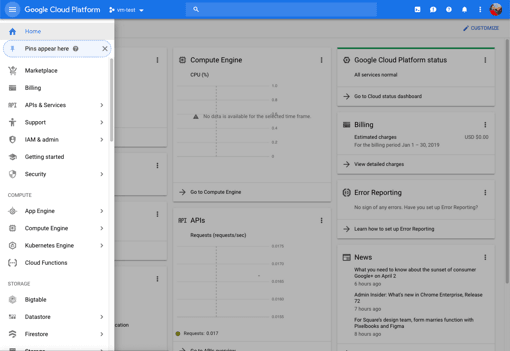
Look for the Compute category, and go to Compute Engine, then select the ‘VM instances‘ item.
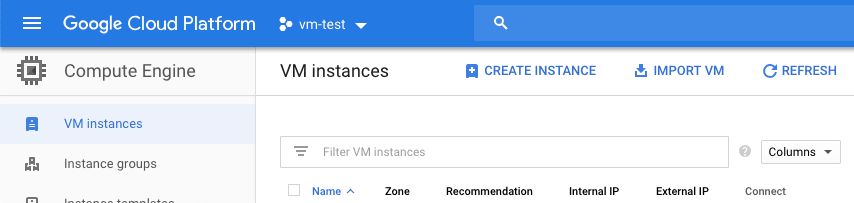
This will show a screen listing your virtual machines. We are now going to create your virtual machine used to host your High Fidelity Domain server.
Create a VM instance
Click on ‘CREATE INSTANCE‘ at the top of the screen:
Give your virtual machine a name, then select the closest geographical region to you.
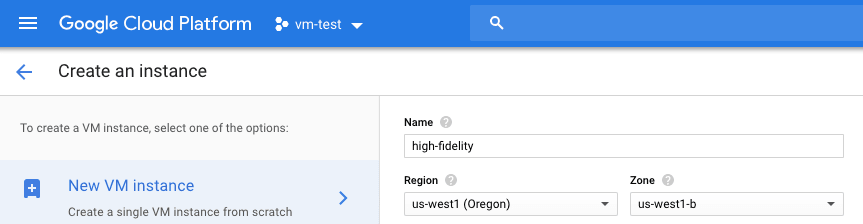
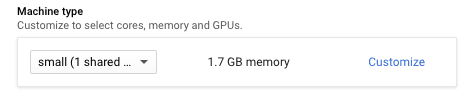
For Machine type, I’d recommend the small 1.7 GB memory, g1-small option. This will give you 1 shared vCPU with just under 2 GB of ram which I found to be sufficient to get started.
The great thing about the Google Compute service is that it’s easy to scale up as your needs grow.
High Fidelity Docker Container
We are going to use the Container option to deploy a Docker container to this virtual machine. This is what makes this setup particularly easy, you don’t have to worry about compiling the server yourself as the entire stack has already been packaged up for you by High Fidelity.
Click the ‘Deploy a container image to this VM instance.’ checkbox:
For the container image textbox, enter the following:
registry.hub.docker.com/highfidelity/hifi:stable
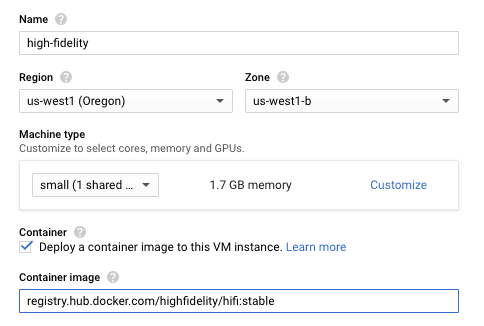
The above tells Google Compute to pull a Docker container from the Docker Hub registry, specifically the container tagged “stable” which points to the latest official release from High Fidelity.
Next, we’ll set up a Network tag that will allow us to open up the required ports for communication between our server and High Fidelity. Under the Firewall label, click the Networking tab. Below you’ll see Network tags. Input the following:
high-fidelity
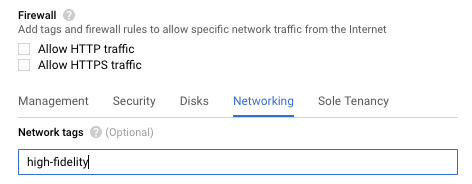
This is a new tag we are referencing later and we’ll define it after we create the VM. So go ahead and click ‘Create‘ to configure our VM instance.
Opening the Firewall
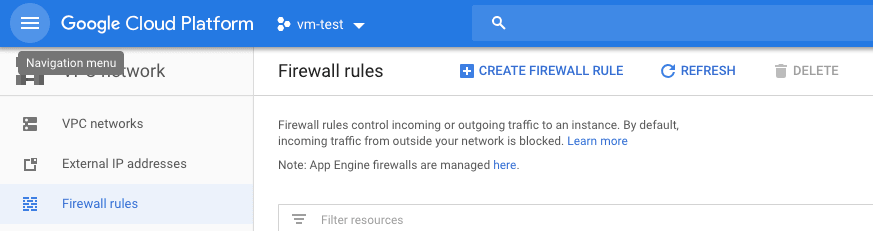
Now, let’s open up the required ports mentioned above. Click on the menu on the top left of the screen and find the Networking label. Below that, select the VPC network and click the Firewall rules selection:
At the top of the screen, click the ‘CREATE FIREWALL RULE‘ button. Give it a descriptive name like, “high-fidelity-rule”.
Under the Target tags, enter the same tag name we referenced earlier:
high-fidelity
For Source IP ranges, enter:
0.0.0.0/0
Under Protocols and ports, check both tcp and udp and fill out as follows:
40100-40102 for both tcp and udp, as well as 48000-48006 for udp.
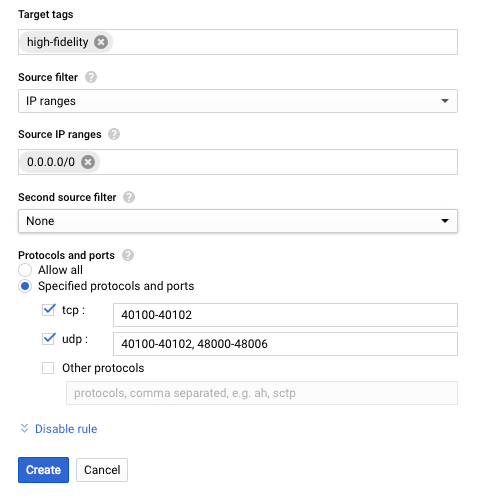
Click ‘Create‘ and that will complete the rule definition to allow communication with High Fidelity.
Starting the VM
Now, let’s get our VM instance started! Open the left menu again, go to Compute Engine and then VM instances. Click the checkbox next to your instance name, and click the ‘START‘ button at the top. Give it a quick minute to spin up and you’ll see a green checkmark indicating the machine is running.
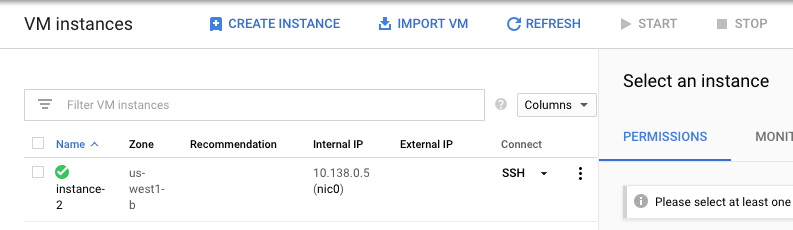
At this point you’ll need the external IP to connect to your server. I found the quickest way to get it is just refresh the browser window while on this screen. You should then see the External IP field populate for the VM.
High Fidelity Domain Server
Open a browser with the external IP shown and port 40100:
http://your-ip-address-here:40100
You’ll be taken to the High Fidelity Setup Wizard which means everything worked and your domain server is running on Google Compute!
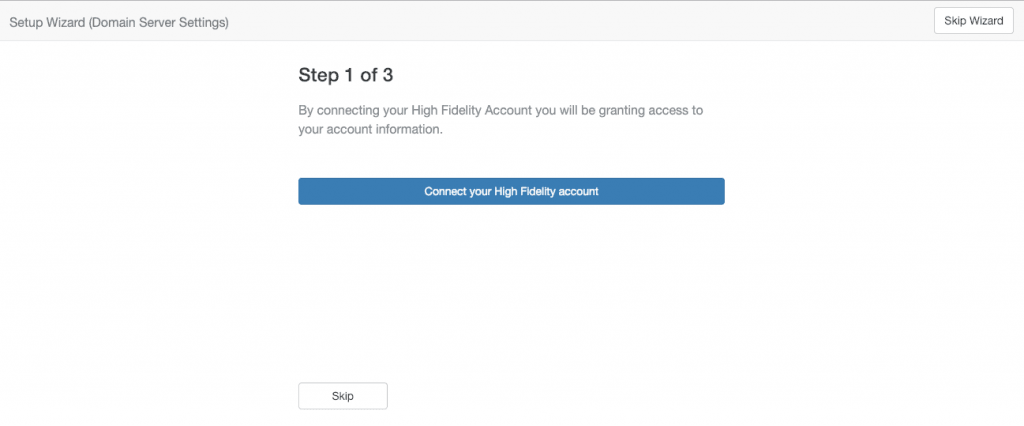
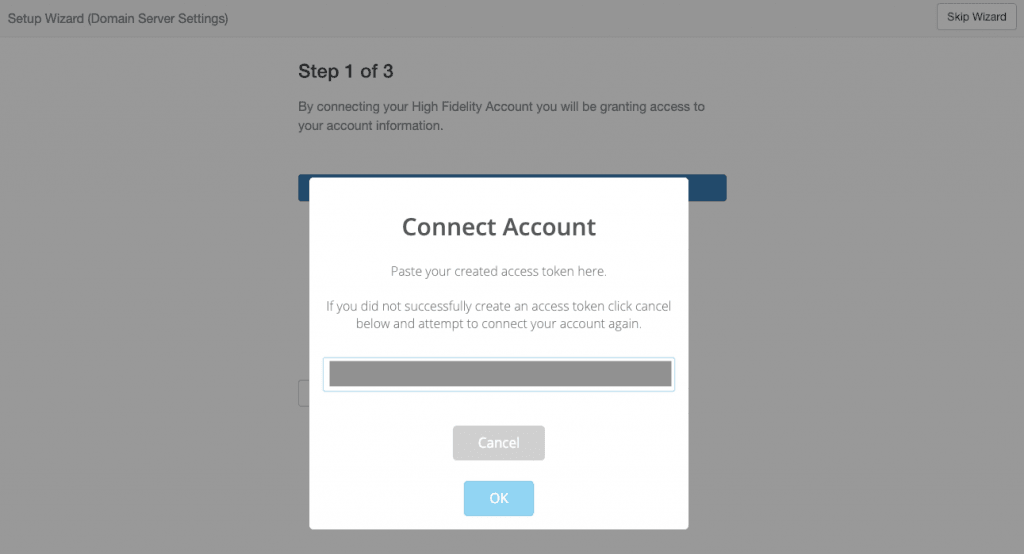
Next, click ‘Connect your High Fidelity account’.
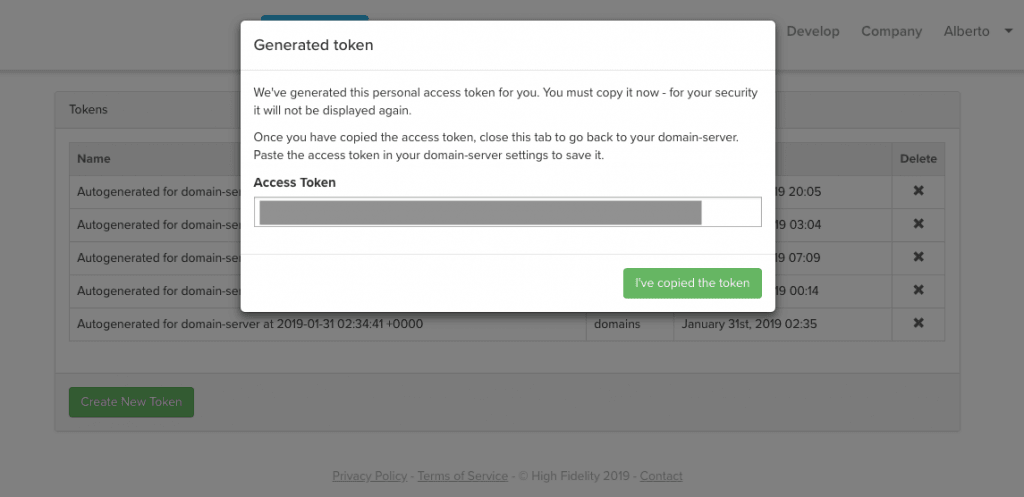
Click ‘Create New Token’ to generate a personal access token. Copy it to the clipboard and click ‘I’ve copied the token‘.
Paste the token in the Connect Account dialog.
The next step, Step 2, is for setting up a friendly place name. You can skip this for now by clicking ‘Next’. It’s not needed for initial setup but can be convenient to configure later.
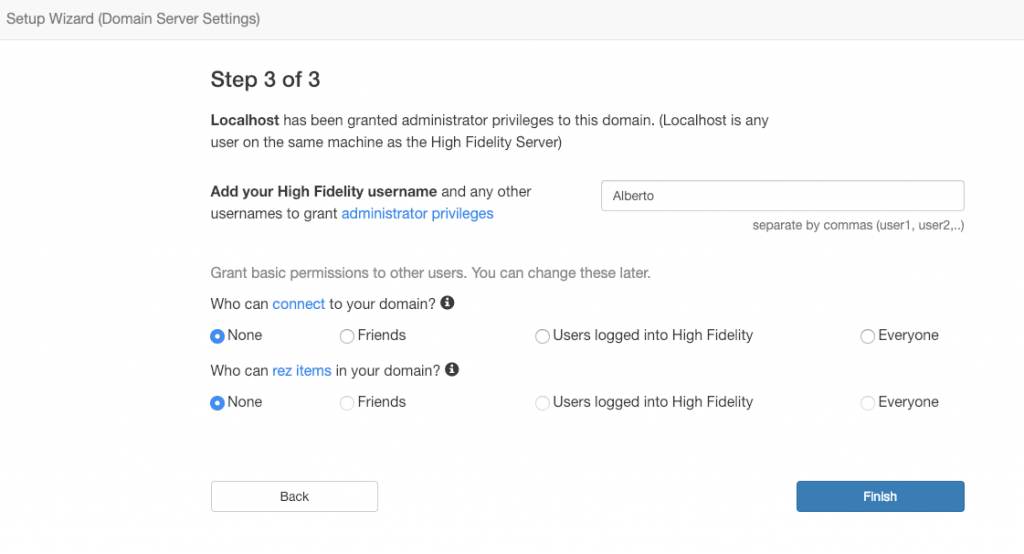
Enter your High Fidelity username to give you admin access to your domain and click ‘Finish’.
You’ll be taken to your domain admin panel screen which will show your High Fidelity account is connected.
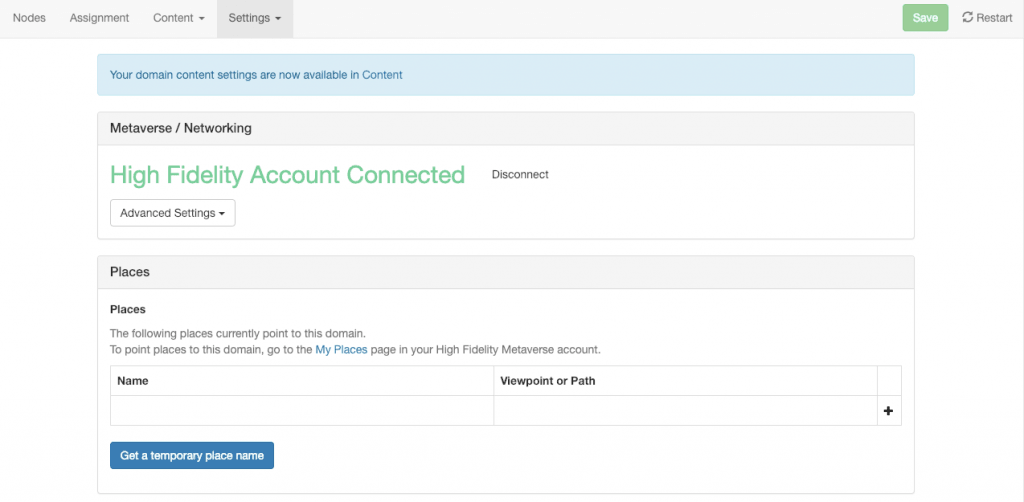
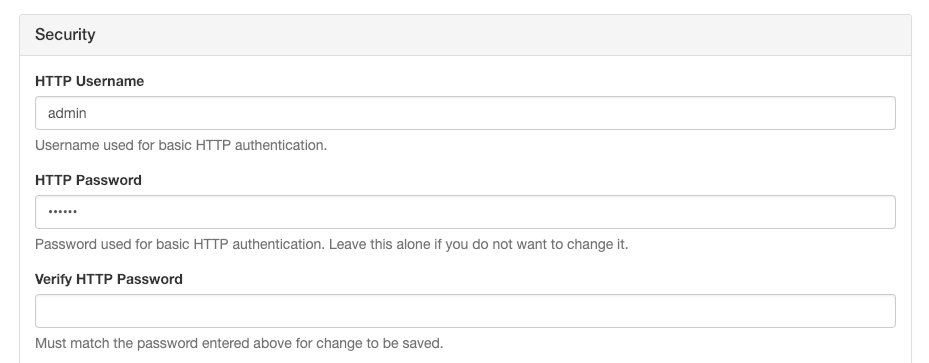
Next, scroll down to the Security panel where you’ll secure your domain settings by choosing a username and password. This will prevent unauthorized access as you’ll be prompted to enter these credentials when accessing this page. Click the ‘Save‘ button on the top right of the page to apply.
Now that the basic settings are configured, let’s take it for a spin!
Connecting to Your Domain
Copy your server’s external IP address from the Google VM instance to the clipboard. Open up your High Fidelity interface client in Desktop mode so you can paste the IP address easily. Click the ‘GOTO’ button in the bottom panel and enter in the IP and press enter.
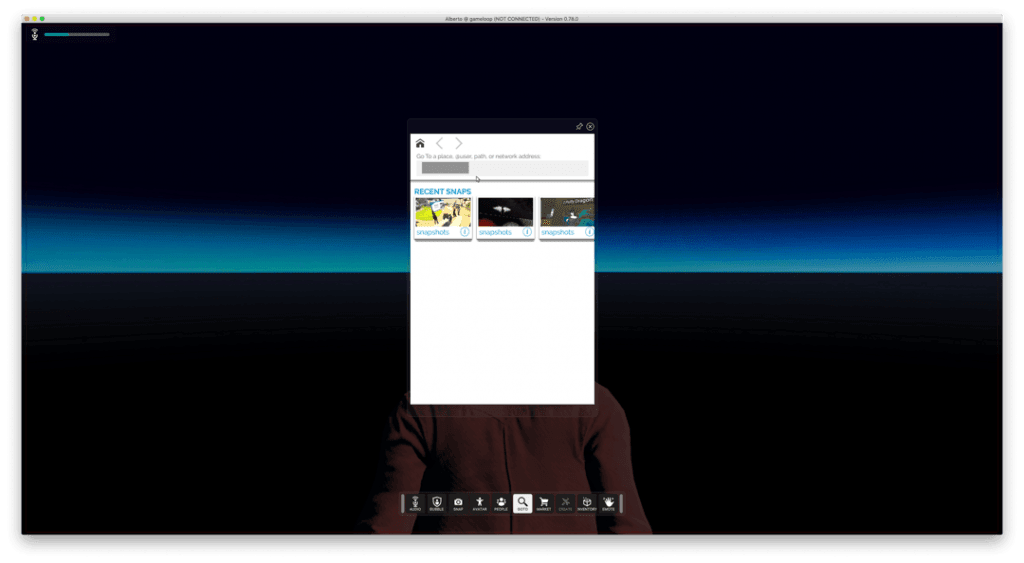
You should see your avatar floating in space in your newly created domain powered by Google Compute.
Congratulations!
You now have a cloud hosted domain where you can create your own VR world. Things you may want to try later include setting up a static IP address and getting a permanent place name in High Fidelity so your domain is easy to find and share with others once you’re ready.
There are plenty of tutorials online and on High Fidelity’s website on how to import 3D objects, create interactions with scripts, and much more. There’s lots to learn and a supportive community of creators you can connect with as you bring your ideas to life.
You’ve also had a quick introduction to the Google Cloud Platform and how quickly you can spin up a virtual machine to deploy a VR server domain. There are many other services available and there are some great guided tutorials at the Google Codelabs page. Be sure to check those out as well.
Have fun and I hope you found this guide helpful in getting started with cloud hosted VR domains in High Fidelity using Google Cloud Platform.

I’m stuck at the Firewall Rule; its requesting at least one valid IP range, but I see yours is blank?
Enter “0.0.0.0/0” for IP range. I’ve updated the screenshot to show that.
Awesome, thanks!
This is insane. You guys are doing amazing work. Keep it up!
Thanks! I’m glad you found it helpful.